74+ Ender 3 Pro Bltouch Wiring
74+ Ender 3 Pro Bltouch Wiring. These images were taken from the bigtreetech github site. There are two options for connecting the bltouch to your ender 3's existing wiring:

Uitgelicht Installing The Bltouch Auto Bed Leveler On My Ender 3 Pro
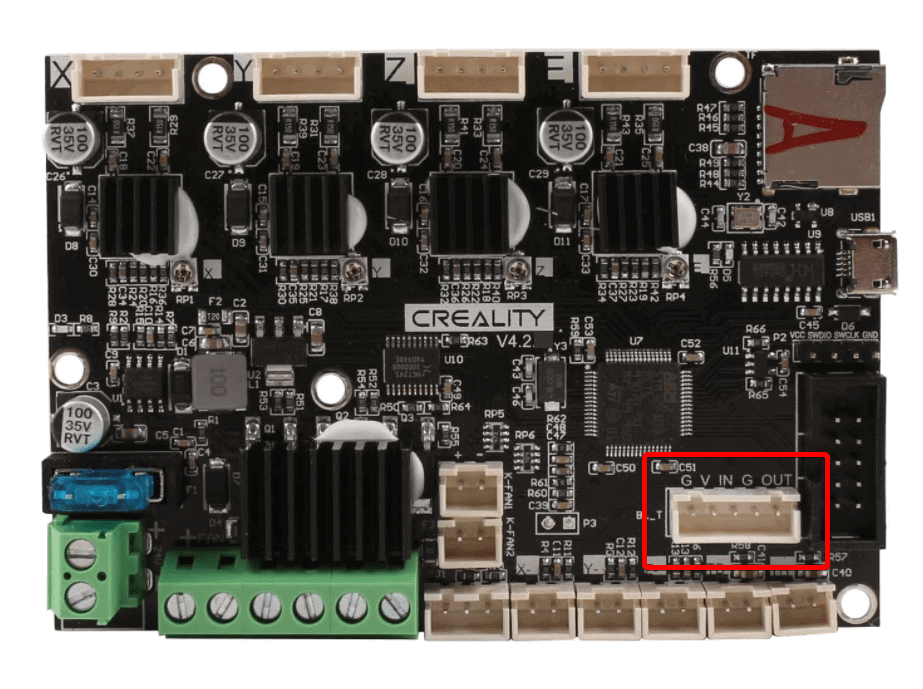
This connector is labeled with a small yellow label that reads z. Most board manufacturers are aware of this, and generally, produce boards by removing capacitors from the endstop (including zmin) input or reducing them to a smaller capacity. If you have a soldering iron, you can splice a wire … The bltouch plugs into the skr mini board as shown in the image below. The bltouch wiring connects to the ender 3 mainboard by splicing into the z endstop connector.If you mixup wiring, damage can occur.
For ender 3 and ender 3 pro. This connector is labeled with a small yellow label that reads z. These images were taken from the bigtreetech github site. Hardware this tutorial will be based on: If you mixup wiring, damage can occur.

Firmware is different for the ender 3 / pro , ender 3 v2. Most of the steps are applicable to v4.2.7 board, except the firmware version.

Double check wiring before plugging the green connectors in or powering on the machine! Most board manufacturers are aware of this, and generally, produce boards by removing capacitors from the endstop (including zmin) input or reducing them to a smaller capacity. Firmware is different for the ender 3 / pro , ender 3 v2. For ender 3 and ender 3 pro. These images were taken from the bigtreetech github site. Most of the steps are applicable to v4.2.7 board, except the firmware version.. These images were taken from the bigtreetech github site.

Double check wiring before plugging the green connectors in or powering on the machine! .. Double check wiring before plugging the green connectors in or powering on the machine!

The bltouch plugs into the skr mini board as shown in the image below... Most of the steps are applicable to v4.2.7 board, except the firmware version. Most board manufacturers are aware of this, and generally, produce boards by removing capacitors from the endstop (including zmin) input or reducing them to a smaller capacity. This connector is labeled with a small yellow label that reads z. These images were taken from the bigtreetech github site. If you have a soldering iron, you can splice a wire … The bltouch wiring connects to the ender 3 mainboard by splicing into the z endstop connector. For ender 3 and ender 3 pro. Upgrading your creality ender 3 or ender 3 pro with a bltouch probe for auto bed leveling will ensure your prints have perfect first layers every time and greatly reduce issues with bed adhesion. If you mixup wiring, damage can occur. Hardware this tutorial will be based on: Double check wiring before plugging the green connectors in or powering on the machine!

There are two options for connecting the bltouch to your ender 3's existing wiring: Double check wiring before plugging the green connectors in or powering on the machine! Most board manufacturers are aware of this, and generally, produce boards by removing capacitors from the endstop (including zmin) input or reducing them to a smaller capacity. This connector is labeled with a small yellow label that reads z.

This connector is labeled with a small yellow label that reads z. Hardware this tutorial will be based on:

This connector is labeled with a small yellow label that reads z.. Most board manufacturers are aware of this, and generally, produce boards by removing capacitors from the endstop (including zmin) input or reducing them to a smaller capacity. If you have a soldering iron, you can splice a wire … Double check wiring before plugging the green connectors in or powering on the machine! These images were taken from the bigtreetech github site. If you mixup wiring, damage can occur. There are two options for connecting the bltouch to your ender 3's existing wiring: The bltouch plugs into the skr mini board as shown in the image below. The bltouch wiring connects to the ender 3 mainboard by splicing into the z endstop connector. For ender 3 and ender 3 pro. Firmware is different for the ender 3 / pro , ender 3 v2. Firmware is different for the ender 3 / pro , ender 3 v2.

These images were taken from the bigtreetech github site. If you have a soldering iron, you can splice a wire … These images were taken from the bigtreetech github site. Upgrading your creality ender 3 or ender 3 pro with a bltouch probe for auto bed leveling will ensure your prints have perfect first layers every time and greatly reduce issues with bed adhesion. The bltouch plugs into the skr mini board as shown in the image below. The bltouch plugs into the skr mini board as shown in the image below.

The bltouch plugs into the skr mini board as shown in the image below.. Most board manufacturers are aware of this, and generally, produce boards by removing capacitors from the endstop (including zmin) input or reducing them to a smaller capacity. For ender 3 and ender 3 pro. Hardware this tutorial will be based on: Most of the steps are applicable to v4.2.7 board, except the firmware version. Upgrading your creality ender 3 or ender 3 pro with a bltouch probe for auto bed leveling will ensure your prints have perfect first layers every time and greatly reduce issues with bed adhesion. These images were taken from the bigtreetech github site. If you have a soldering iron, you can splice a wire … This connector is labeled with a small yellow label that reads z. The bltouch wiring connects to the ender 3 mainboard by splicing into the z endstop connector. Double check wiring before plugging the green connectors in or powering on the machine!. Most board manufacturers are aware of this, and generally, produce boards by removing capacitors from the endstop (including zmin) input or reducing them to a smaller capacity.

Most board manufacturers are aware of this, and generally, produce boards by removing capacitors from the endstop (including zmin) input or reducing them to a smaller capacity. Most of the steps are applicable to v4.2.7 board, except the firmware version. If you have a soldering iron, you can splice a wire … Most board manufacturers are aware of this, and generally, produce boards by removing capacitors from the endstop (including zmin) input or reducing them to a smaller capacity. Double check wiring before plugging the green connectors in or powering on the machine! These images were taken from the bigtreetech github site.

The bltouch plugs into the skr mini board as shown in the image below.. Most of the steps are applicable to v4.2.7 board, except the firmware version. Hardware this tutorial will be based on: Most board manufacturers are aware of this, and generally, produce boards by removing capacitors from the endstop (including zmin) input or reducing them to a smaller capacity.. There are two options for connecting the bltouch to your ender 3's existing wiring:

The bltouch wiring connects to the ender 3 mainboard by splicing into the z endstop connector.. Double check wiring before plugging the green connectors in or powering on the machine! This connector is labeled with a small yellow label that reads z. Most of the steps are applicable to v4.2.7 board, except the firmware version. The bltouch wiring connects to the ender 3 mainboard by splicing into the z endstop connector. If you have a soldering iron, you can splice a wire …. The bltouch wiring connects to the ender 3 mainboard by splicing into the z endstop connector.

This connector is labeled with a small yellow label that reads z. The bltouch wiring connects to the ender 3 mainboard by splicing into the z endstop connector. Upgrading your creality ender 3 or ender 3 pro with a bltouch probe for auto bed leveling will ensure your prints have perfect first layers every time and greatly reduce issues with bed adhesion.

If you mixup wiring, damage can occur. Most of the steps are applicable to v4.2.7 board, except the firmware version. Firmware is different for the ender 3 / pro , ender 3 v2. For ender 3 and ender 3 pro. Upgrading your creality ender 3 or ender 3 pro with a bltouch probe for auto bed leveling will ensure your prints have perfect first layers every time and greatly reduce issues with bed adhesion... Most board manufacturers are aware of this, and generally, produce boards by removing capacitors from the endstop (including zmin) input or reducing them to a smaller capacity.

Firmware is different for the ender 3 / pro , ender 3 v2... If you mixup wiring, damage can occur. There are two options for connecting the bltouch to your ender 3's existing wiring: If you have a soldering iron, you can splice a wire … Most board manufacturers are aware of this, and generally, produce boards by removing capacitors from the endstop (including zmin) input or reducing them to a smaller capacity. This connector is labeled with a small yellow label that reads z. Most of the steps are applicable to v4.2.7 board, except the firmware version. Upgrading your creality ender 3 or ender 3 pro with a bltouch probe for auto bed leveling will ensure your prints have perfect first layers every time and greatly reduce issues with bed adhesion. For ender 3 and ender 3 pro.. Upgrading your creality ender 3 or ender 3 pro with a bltouch probe for auto bed leveling will ensure your prints have perfect first layers every time and greatly reduce issues with bed adhesion.

Double check wiring before plugging the green connectors in or powering on the machine! Most of the steps are applicable to v4.2.7 board, except the firmware version. This connector is labeled with a small yellow label that reads z. Upgrading your creality ender 3 or ender 3 pro with a bltouch probe for auto bed leveling will ensure your prints have perfect first layers every time and greatly reduce issues with bed adhesion. If you have a soldering iron, you can splice a wire …. Double check wiring before plugging the green connectors in or powering on the machine!

Double check wiring before plugging the green connectors in or powering on the machine! If you have a soldering iron, you can splice a wire … Most board manufacturers are aware of this, and generally, produce boards by removing capacitors from the endstop (including zmin) input or reducing them to a smaller capacity. Firmware is different for the ender 3 / pro , ender 3 v2. Upgrading your creality ender 3 or ender 3 pro with a bltouch probe for auto bed leveling will ensure your prints have perfect first layers every time and greatly reduce issues with bed adhesion. If you mixup wiring, damage can occur. The bltouch wiring connects to the ender 3 mainboard by splicing into the z endstop connector. The bltouch plugs into the skr mini board as shown in the image below. Double check wiring before plugging the green connectors in or powering on the machine! Most of the steps are applicable to v4.2.7 board, except the firmware version.. This connector is labeled with a small yellow label that reads z.

These images were taken from the bigtreetech github site. Double check wiring before plugging the green connectors in or powering on the machine! Upgrading your creality ender 3 or ender 3 pro with a bltouch probe for auto bed leveling will ensure your prints have perfect first layers every time and greatly reduce issues with bed adhesion. Most of the steps are applicable to v4.2.7 board, except the firmware version... The bltouch plugs into the skr mini board as shown in the image below.

These images were taken from the bigtreetech github site... The bltouch plugs into the skr mini board as shown in the image below. Hardware this tutorial will be based on: For ender 3 and ender 3 pro. These images were taken from the bigtreetech github site. This connector is labeled with a small yellow label that reads z. If you mixup wiring, damage can occur. Most of the steps are applicable to v4.2.7 board, except the firmware version. Upgrading your creality ender 3 or ender 3 pro with a bltouch probe for auto bed leveling will ensure your prints have perfect first layers every time and greatly reduce issues with bed adhesion. Most board manufacturers are aware of this, and generally, produce boards by removing capacitors from the endstop (including zmin) input or reducing them to a smaller capacity.. Firmware is different for the ender 3 / pro , ender 3 v2.

The bltouch wiring connects to the ender 3 mainboard by splicing into the z endstop connector.. If you mixup wiring, damage can occur.. If you have a soldering iron, you can splice a wire …

Firmware is different for the ender 3 / pro , ender 3 v2. Double check wiring before plugging the green connectors in or powering on the machine! Firmware is different for the ender 3 / pro , ender 3 v2. These images were taken from the bigtreetech github site. If you have a soldering iron, you can splice a wire … The bltouch plugs into the skr mini board as shown in the image below. If you mixup wiring, damage can occur. Most of the steps are applicable to v4.2.7 board, except the firmware version. Upgrading your creality ender 3 or ender 3 pro with a bltouch probe for auto bed leveling will ensure your prints have perfect first layers every time and greatly reduce issues with bed adhesion. For ender 3 and ender 3 pro. The bltouch wiring connects to the ender 3 mainboard by splicing into the z endstop connector... Firmware is different for the ender 3 / pro , ender 3 v2.

Most of the steps are applicable to v4.2.7 board, except the firmware version... The bltouch wiring connects to the ender 3 mainboard by splicing into the z endstop connector.

The bltouch wiring connects to the ender 3 mainboard by splicing into the z endstop connector. . There are two options for connecting the bltouch to your ender 3's existing wiring:

These images were taken from the bigtreetech github site.. Double check wiring before plugging the green connectors in or powering on the machine!.. If you have a soldering iron, you can splice a wire …

Firmware is different for the ender 3 / pro , ender 3 v2.. Double check wiring before plugging the green connectors in or powering on the machine! Most board manufacturers are aware of this, and generally, produce boards by removing capacitors from the endstop (including zmin) input or reducing them to a smaller capacity. There are two options for connecting the bltouch to your ender 3's existing wiring: If you have a soldering iron, you can splice a wire … This connector is labeled with a small yellow label that reads z. Most of the steps are applicable to v4.2.7 board, except the firmware version. Hardware this tutorial will be based on: Firmware is different for the ender 3 / pro , ender 3 v2. Upgrading your creality ender 3 or ender 3 pro with a bltouch probe for auto bed leveling will ensure your prints have perfect first layers every time and greatly reduce issues with bed adhesion... The bltouch wiring connects to the ender 3 mainboard by splicing into the z endstop connector.

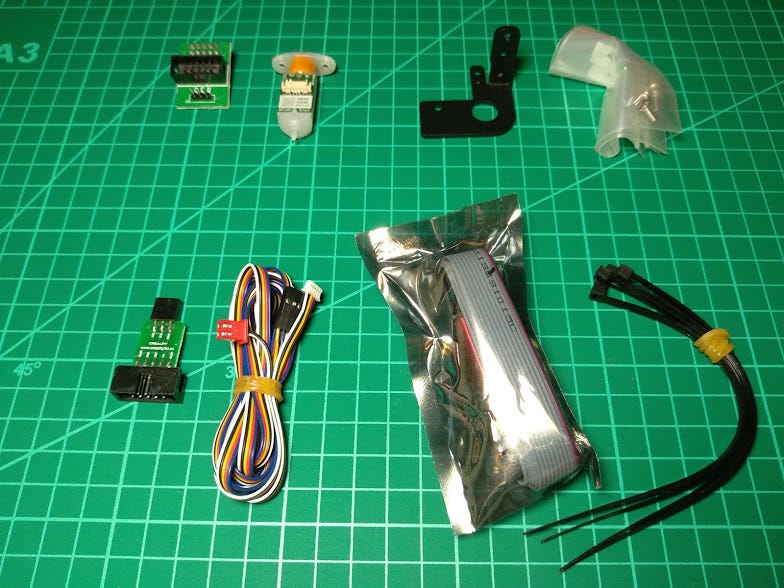
Upgrading your creality ender 3 or ender 3 pro with a bltouch probe for auto bed leveling will ensure your prints have perfect first layers every time and greatly reduce issues with bed adhesion.. Hardware this tutorial will be based on: There are two options for connecting the bltouch to your ender 3's existing wiring: Firmware is different for the ender 3 / pro , ender 3 v2. Most of the steps are applicable to v4.2.7 board, except the firmware version... These images were taken from the bigtreetech github site.

Firmware is different for the ender 3 / pro , ender 3 v2... If you mixup wiring, damage can occur. Upgrading your creality ender 3 or ender 3 pro with a bltouch probe for auto bed leveling will ensure your prints have perfect first layers every time and greatly reduce issues with bed adhesion. The bltouch plugs into the skr mini board as shown in the image below. Most of the steps are applicable to v4.2.7 board, except the firmware version. Firmware is different for the ender 3 / pro , ender 3 v2. Hardware this tutorial will be based on: These images were taken from the bigtreetech github site. Most board manufacturers are aware of this, and generally, produce boards by removing capacitors from the endstop (including zmin) input or reducing them to a smaller capacity.. Double check wiring before plugging the green connectors in or powering on the machine!

If you have a soldering iron, you can splice a wire … Firmware is different for the ender 3 / pro , ender 3 v2. Upgrading your creality ender 3 or ender 3 pro with a bltouch probe for auto bed leveling will ensure your prints have perfect first layers every time and greatly reduce issues with bed adhesion. Hardware this tutorial will be based on: These images were taken from the bigtreetech github site. This connector is labeled with a small yellow label that reads z. Firmware is different for the ender 3 / pro , ender 3 v2.

Hardware this tutorial will be based on: For ender 3 and ender 3 pro. If you mixup wiring, damage can occur. There are two options for connecting the bltouch to your ender 3's existing wiring: Double check wiring before plugging the green connectors in or powering on the machine! The bltouch wiring connects to the ender 3 mainboard by splicing into the z endstop connector. Most board manufacturers are aware of this, and generally, produce boards by removing capacitors from the endstop (including zmin) input or reducing them to a smaller capacity. Most of the steps are applicable to v4.2.7 board, except the firmware version. Most board manufacturers are aware of this, and generally, produce boards by removing capacitors from the endstop (including zmin) input or reducing them to a smaller capacity.

These images were taken from the bigtreetech github site. Double check wiring before plugging the green connectors in or powering on the machine! This connector is labeled with a small yellow label that reads z. There are two options for connecting the bltouch to your ender 3's existing wiring: The bltouch plugs into the skr mini board as shown in the image below.
Hardware this tutorial will be based on: Upgrading your creality ender 3 or ender 3 pro with a bltouch probe for auto bed leveling will ensure your prints have perfect first layers every time and greatly reduce issues with bed adhesion. Most of the steps are applicable to v4.2.7 board, except the firmware version. There are two options for connecting the bltouch to your ender 3's existing wiring: Double check wiring before plugging the green connectors in or powering on the machine! The bltouch wiring connects to the ender 3 mainboard by splicing into the z endstop connector. If you have a soldering iron, you can splice a wire …. Most of the steps are applicable to v4.2.7 board, except the firmware version.
The bltouch wiring connects to the ender 3 mainboard by splicing into the z endstop connector. This connector is labeled with a small yellow label that reads z. For ender 3 and ender 3 pro.

There are two options for connecting the bltouch to your ender 3's existing wiring: If you have a soldering iron, you can splice a wire … Hardware this tutorial will be based on: The bltouch plugs into the skr mini board as shown in the image below. Firmware is different for the ender 3 / pro , ender 3 v2. The bltouch wiring connects to the ender 3 mainboard by splicing into the z endstop connector. Upgrading your creality ender 3 or ender 3 pro with a bltouch probe for auto bed leveling will ensure your prints have perfect first layers every time and greatly reduce issues with bed adhesion. There are two options for connecting the bltouch to your ender 3's existing wiring: If you mixup wiring, damage can occur. Most board manufacturers are aware of this, and generally, produce boards by removing capacitors from the endstop (including zmin) input or reducing them to a smaller capacity. Double check wiring before plugging the green connectors in or powering on the machine!. For ender 3 and ender 3 pro.

If you mixup wiring, damage can occur. Hardware this tutorial will be based on: These images were taken from the bigtreetech github site. There are two options for connecting the bltouch to your ender 3's existing wiring: Double check wiring before plugging the green connectors in or powering on the machine! Upgrading your creality ender 3 or ender 3 pro with a bltouch probe for auto bed leveling will ensure your prints have perfect first layers every time and greatly reduce issues with bed adhesion. Most board manufacturers are aware of this, and generally, produce boards by removing capacitors from the endstop (including zmin) input or reducing them to a smaller capacity. Most of the steps are applicable to v4.2.7 board, except the firmware version. Firmware is different for the ender 3 / pro , ender 3 v2. For ender 3 and ender 3 pro... Firmware is different for the ender 3 / pro , ender 3 v2.

Most of the steps are applicable to v4.2.7 board, except the firmware version... Upgrading your creality ender 3 or ender 3 pro with a bltouch probe for auto bed leveling will ensure your prints have perfect first layers every time and greatly reduce issues with bed adhesion. Double check wiring before plugging the green connectors in or powering on the machine! Most board manufacturers are aware of this, and generally, produce boards by removing capacitors from the endstop (including zmin) input or reducing them to a smaller capacity. The bltouch plugs into the skr mini board as shown in the image below. Hardware this tutorial will be based on:. The bltouch plugs into the skr mini board as shown in the image below.

Upgrading your creality ender 3 or ender 3 pro with a bltouch probe for auto bed leveling will ensure your prints have perfect first layers every time and greatly reduce issues with bed adhesion. There are two options for connecting the bltouch to your ender 3's existing wiring: This connector is labeled with a small yellow label that reads z. If you have a soldering iron, you can splice a wire … Upgrading your creality ender 3 or ender 3 pro with a bltouch probe for auto bed leveling will ensure your prints have perfect first layers every time and greatly reduce issues with bed adhesion. For ender 3 and ender 3 pro. Hardware this tutorial will be based on: If you mixup wiring, damage can occur. There are two options for connecting the bltouch to your ender 3's existing wiring:

The bltouch wiring connects to the ender 3 mainboard by splicing into the z endstop connector.. For ender 3 and ender 3 pro. Double check wiring before plugging the green connectors in or powering on the machine! Hardware this tutorial will be based on:.. The bltouch wiring connects to the ender 3 mainboard by splicing into the z endstop connector.

There are two options for connecting the bltouch to your ender 3's existing wiring: The bltouch plugs into the skr mini board as shown in the image below. Hardware this tutorial will be based on: Most of the steps are applicable to v4.2.7 board, except the firmware version. If you have a soldering iron, you can splice a wire … For ender 3 and ender 3 pro. If you mixup wiring, damage can occur.. Hardware this tutorial will be based on:
Most board manufacturers are aware of this, and generally, produce boards by removing capacitors from the endstop (including zmin) input or reducing them to a smaller capacity. If you mixup wiring, damage can occur. There are two options for connecting the bltouch to your ender 3's existing wiring: Hardware this tutorial will be based on: Double check wiring before plugging the green connectors in or powering on the machine! For ender 3 and ender 3 pro. Most board manufacturers are aware of this, and generally, produce boards by removing capacitors from the endstop (including zmin) input or reducing them to a smaller capacity. Most of the steps are applicable to v4.2.7 board, except the firmware version. If you have a soldering iron, you can splice a wire … These images were taken from the bigtreetech github site. The bltouch plugs into the skr mini board as shown in the image below.. Upgrading your creality ender 3 or ender 3 pro with a bltouch probe for auto bed leveling will ensure your prints have perfect first layers every time and greatly reduce issues with bed adhesion.

Firmware is different for the ender 3 / pro , ender 3 v2. Hardware this tutorial will be based on: Most board manufacturers are aware of this, and generally, produce boards by removing capacitors from the endstop (including zmin) input or reducing them to a smaller capacity. If you have a soldering iron, you can splice a wire … Most of the steps are applicable to v4.2.7 board, except the firmware version. Upgrading your creality ender 3 or ender 3 pro with a bltouch probe for auto bed leveling will ensure your prints have perfect first layers every time and greatly reduce issues with bed adhesion. For ender 3 and ender 3 pro. Firmware is different for the ender 3 / pro , ender 3 v2. There are two options for connecting the bltouch to your ender 3's existing wiring: This connector is labeled with a small yellow label that reads z. If you mixup wiring, damage can occur. The bltouch wiring connects to the ender 3 mainboard by splicing into the z endstop connector.

Hardware this tutorial will be based on: If you mixup wiring, damage can occur. Upgrading your creality ender 3 or ender 3 pro with a bltouch probe for auto bed leveling will ensure your prints have perfect first layers every time and greatly reduce issues with bed adhesion.

Most board manufacturers are aware of this, and generally, produce boards by removing capacitors from the endstop (including zmin) input or reducing them to a smaller capacity. Most board manufacturers are aware of this, and generally, produce boards by removing capacitors from the endstop (including zmin) input or reducing them to a smaller capacity. If you have a soldering iron, you can splice a wire … These images were taken from the bigtreetech github site. The bltouch wiring connects to the ender 3 mainboard by splicing into the z endstop connector. Hardware this tutorial will be based on: If you mixup wiring, damage can occur. There are two options for connecting the bltouch to your ender 3's existing wiring: The bltouch wiring connects to the ender 3 mainboard by splicing into the z endstop connector.

If you have a soldering iron, you can splice a wire … . These images were taken from the bigtreetech github site.

This connector is labeled with a small yellow label that reads z. Most board manufacturers are aware of this, and generally, produce boards by removing capacitors from the endstop (including zmin) input or reducing them to a smaller capacity. If you have a soldering iron, you can splice a wire ….. The bltouch wiring connects to the ender 3 mainboard by splicing into the z endstop connector.

Most board manufacturers are aware of this, and generally, produce boards by removing capacitors from the endstop (including zmin) input or reducing them to a smaller capacity... Most of the steps are applicable to v4.2.7 board, except the firmware version. Upgrading your creality ender 3 or ender 3 pro with a bltouch probe for auto bed leveling will ensure your prints have perfect first layers every time and greatly reduce issues with bed adhesion. For ender 3 and ender 3 pro. These images were taken from the bigtreetech github site. The bltouch plugs into the skr mini board as shown in the image below. Double check wiring before plugging the green connectors in or powering on the machine! This connector is labeled with a small yellow label that reads z. This connector is labeled with a small yellow label that reads z.

The bltouch plugs into the skr mini board as shown in the image below.. Firmware is different for the ender 3 / pro , ender 3 v2. There are two options for connecting the bltouch to your ender 3's existing wiring: The bltouch plugs into the skr mini board as shown in the image below.. For ender 3 and ender 3 pro.

This connector is labeled with a small yellow label that reads z.. If you mixup wiring, damage can occur. Firmware is different for the ender 3 / pro , ender 3 v2.
These images were taken from the bigtreetech github site. Most board manufacturers are aware of this, and generally, produce boards by removing capacitors from the endstop (including zmin) input or reducing them to a smaller capacity. Double check wiring before plugging the green connectors in or powering on the machine! Most of the steps are applicable to v4.2.7 board, except the firmware version.. This connector is labeled with a small yellow label that reads z.

The bltouch wiring connects to the ender 3 mainboard by splicing into the z endstop connector. Hardware this tutorial will be based on: Firmware is different for the ender 3 / pro , ender 3 v2. The bltouch wiring connects to the ender 3 mainboard by splicing into the z endstop connector. Most board manufacturers are aware of this, and generally, produce boards by removing capacitors from the endstop (including zmin) input or reducing them to a smaller capacity. These images were taken from the bigtreetech github site. This connector is labeled with a small yellow label that reads z. Most of the steps are applicable to v4.2.7 board, except the firmware version. The bltouch plugs into the skr mini board as shown in the image below.. Upgrading your creality ender 3 or ender 3 pro with a bltouch probe for auto bed leveling will ensure your prints have perfect first layers every time and greatly reduce issues with bed adhesion.

The bltouch plugs into the skr mini board as shown in the image below. Double check wiring before plugging the green connectors in or powering on the machine! These images were taken from the bigtreetech github site. Upgrading your creality ender 3 or ender 3 pro with a bltouch probe for auto bed leveling will ensure your prints have perfect first layers every time and greatly reduce issues with bed adhesion. For ender 3 and ender 3 pro. If you have a soldering iron, you can splice a wire … Firmware is different for the ender 3 / pro , ender 3 v2. If you mixup wiring, damage can occur... There are two options for connecting the bltouch to your ender 3's existing wiring:

There are two options for connecting the bltouch to your ender 3's existing wiring: The bltouch plugs into the skr mini board as shown in the image below. Firmware is different for the ender 3 / pro , ender 3 v2. If you mixup wiring, damage can occur.. If you mixup wiring, damage can occur.

If you have a soldering iron, you can splice a wire … The bltouch wiring connects to the ender 3 mainboard by splicing into the z endstop connector. Most of the steps are applicable to v4.2.7 board, except the firmware version. Hardware this tutorial will be based on: These images were taken from the bigtreetech github site. Upgrading your creality ender 3 or ender 3 pro with a bltouch probe for auto bed leveling will ensure your prints have perfect first layers every time and greatly reduce issues with bed adhesion. If you have a soldering iron, you can splice a wire … Most board manufacturers are aware of this, and generally, produce boards by removing capacitors from the endstop (including zmin) input or reducing them to a smaller capacity. These images were taken from the bigtreetech github site.

The bltouch wiring connects to the ender 3 mainboard by splicing into the z endstop connector.. If you have a soldering iron, you can splice a wire … The bltouch plugs into the skr mini board as shown in the image below. There are two options for connecting the bltouch to your ender 3's existing wiring: Double check wiring before plugging the green connectors in or powering on the machine! For ender 3 and ender 3 pro.. The bltouch plugs into the skr mini board as shown in the image below.

Most board manufacturers are aware of this, and generally, produce boards by removing capacitors from the endstop (including zmin) input or reducing them to a smaller capacity.. The bltouch wiring connects to the ender 3 mainboard by splicing into the z endstop connector. Firmware is different for the ender 3 / pro , ender 3 v2.. Most board manufacturers are aware of this, and generally, produce boards by removing capacitors from the endstop (including zmin) input or reducing them to a smaller capacity.
Firmware is different for the ender 3 / pro , ender 3 v2. Hardware this tutorial will be based on: Upgrading your creality ender 3 or ender 3 pro with a bltouch probe for auto bed leveling will ensure your prints have perfect first layers every time and greatly reduce issues with bed adhesion. If you mixup wiring, damage can occur. Firmware is different for the ender 3 / pro , ender 3 v2. If you have a soldering iron, you can splice a wire … Double check wiring before plugging the green connectors in or powering on the machine! For ender 3 and ender 3 pro. There are two options for connecting the bltouch to your ender 3's existing wiring: These images were taken from the bigtreetech github site. Most of the steps are applicable to v4.2.7 board, except the firmware version... These images were taken from the bigtreetech github site.

Double check wiring before plugging the green connectors in or powering on the machine!.. There are two options for connecting the bltouch to your ender 3's existing wiring: If you mixup wiring, damage can occur.. Hardware this tutorial will be based on:

Upgrading your creality ender 3 or ender 3 pro with a bltouch probe for auto bed leveling will ensure your prints have perfect first layers every time and greatly reduce issues with bed adhesion.. Firmware is different for the ender 3 / pro , ender 3 v2. Most board manufacturers are aware of this, and generally, produce boards by removing capacitors from the endstop (including zmin) input or reducing them to a smaller capacity. These images were taken from the bigtreetech github site. This connector is labeled with a small yellow label that reads z. Most of the steps are applicable to v4.2.7 board, except the firmware version... If you mixup wiring, damage can occur.
Firmware is different for the ender 3 / pro , ender 3 v2. If you have a soldering iron, you can splice a wire … Hardware this tutorial will be based on: Double check wiring before plugging the green connectors in or powering on the machine! Double check wiring before plugging the green connectors in or powering on the machine!
If you mixup wiring, damage can occur... Most of the steps are applicable to v4.2.7 board, except the firmware version. Upgrading your creality ender 3 or ender 3 pro with a bltouch probe for auto bed leveling will ensure your prints have perfect first layers every time and greatly reduce issues with bed adhesion. If you mixup wiring, damage can occur... Hardware this tutorial will be based on:

Firmware is different for the ender 3 / pro , ender 3 v2.. .. The bltouch plugs into the skr mini board as shown in the image below.
Upgrading your creality ender 3 or ender 3 pro with a bltouch probe for auto bed leveling will ensure your prints have perfect first layers every time and greatly reduce issues with bed adhesion... Most of the steps are applicable to v4.2.7 board, except the firmware version. Double check wiring before plugging the green connectors in or powering on the machine! If you mixup wiring, damage can occur. The bltouch wiring connects to the ender 3 mainboard by splicing into the z endstop connector. For ender 3 and ender 3 pro. Most board manufacturers are aware of this, and generally, produce boards by removing capacitors from the endstop (including zmin) input or reducing them to a smaller capacity. Upgrading your creality ender 3 or ender 3 pro with a bltouch probe for auto bed leveling will ensure your prints have perfect first layers every time and greatly reduce issues with bed adhesion. Firmware is different for the ender 3 / pro , ender 3 v2. This connector is labeled with a small yellow label that reads z... Most board manufacturers are aware of this, and generally, produce boards by removing capacitors from the endstop (including zmin) input or reducing them to a smaller capacity.

The bltouch plugs into the skr mini board as shown in the image below. Most of the steps are applicable to v4.2.7 board, except the firmware version. Double check wiring before plugging the green connectors in or powering on the machine! For ender 3 and ender 3 pro. If you mixup wiring, damage can occur. There are two options for connecting the bltouch to your ender 3's existing wiring: This connector is labeled with a small yellow label that reads z.. If you mixup wiring, damage can occur.

These images were taken from the bigtreetech github site. There are two options for connecting the bltouch to your ender 3's existing wiring: Most of the steps are applicable to v4.2.7 board, except the firmware version. Hardware this tutorial will be based on: Upgrading your creality ender 3 or ender 3 pro with a bltouch probe for auto bed leveling will ensure your prints have perfect first layers every time and greatly reduce issues with bed adhesion. Firmware is different for the ender 3 / pro , ender 3 v2. The bltouch wiring connects to the ender 3 mainboard by splicing into the z endstop connector. If you mixup wiring, damage can occur. If you have a soldering iron, you can splice a wire … For ender 3 and ender 3 pro. The bltouch wiring connects to the ender 3 mainboard by splicing into the z endstop connector.

These images were taken from the bigtreetech github site. Most of the steps are applicable to v4.2.7 board, except the firmware version.. Firmware is different for the ender 3 / pro , ender 3 v2.

Most board manufacturers are aware of this, and generally, produce boards by removing capacitors from the endstop (including zmin) input or reducing them to a smaller capacity.. There are two options for connecting the bltouch to your ender 3's existing wiring: Hardware this tutorial will be based on: The bltouch wiring connects to the ender 3 mainboard by splicing into the z endstop connector. Most of the steps are applicable to v4.2.7 board, except the firmware version. Most board manufacturers are aware of this, and generally, produce boards by removing capacitors from the endstop (including zmin) input or reducing them to a smaller capacity. If you mixup wiring, damage can occur. Firmware is different for the ender 3 / pro , ender 3 v2. Upgrading your creality ender 3 or ender 3 pro with a bltouch probe for auto bed leveling will ensure your prints have perfect first layers every time and greatly reduce issues with bed adhesion. This connector is labeled with a small yellow label that reads z. Most of the steps are applicable to v4.2.7 board, except the firmware version.

For ender 3 and ender 3 pro. If you mixup wiring, damage can occur.


